You are here
Updated features in KENET Web Conference Platform V2.7
- Posted on: 15 February 2024
- By: admin
a)Managing Layouts
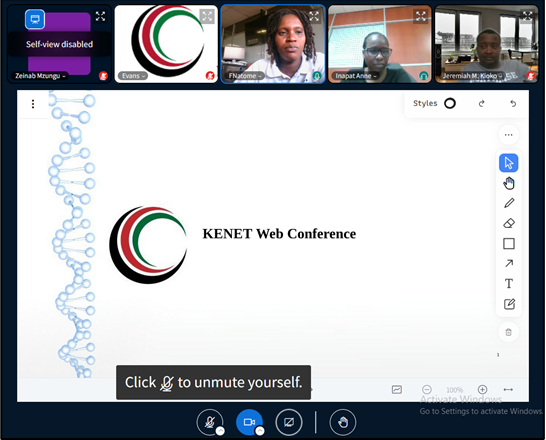
In a session, the default view is designed to provide a comprehensive and intuitive layout, incorporating both webcam feeds and the whiteboard/presentation area.

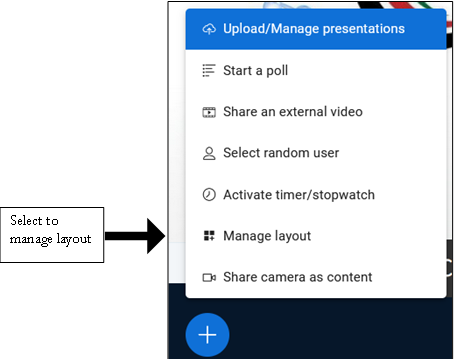
As a moderator, you can manage layout of the participants by selecting “manage layout” in the action menu located at the bottom left of the presentation screen.

Choose from the available layouts: Grid Layout, Custom Layout, Smart Layout, and Focus on Presentation.
- Grid Layout: Ideal for evenly arranging participant videos in a grid pattern.
- Custom Layout: Allows you to manually arrange and resize participant videos according to your preference.
- Smart Layout: Automatically adjusts based on participant activity to highlight the most relevant content.
- Focus on Presentation: Emphasizes the content being shared by a presenter

Once you have selected the desired layout, click on "Update Everyone" to apply the changes to everyone.

b)Camera as content
As a moderator, you have the option to make your webcam the primary focus in the presentation area, ensuring that participants pay attention to the speaker during a session.
To activate camera as content, locate the action menu and select “Camera as Content”.

This will set your webcam as the primary content in the presentation area.

c)Self-view
When the web cam is on, you can decide to emphasise your camera view by selecting the dropdown menu alongside your name in the video and select “self-view”.

You can as well combat video fatigue by disabling the self-view of your webcam.
To do this:
- Click on the dropdown menu and choose the "Disable Self-View" option.
- Once selected, your self-view will be disabled, allowing you to focus on the content and interactions without seeing your own video feed.
Re-enabling Self-View
At any point during the session, if you wish to re-enable the view of your webcam, follow the same process of selecting "Enable Self-View".
d)Set the Presentation to be Downloadable
You can now set your presentation to be downloadable in the original uploaded file, PDF file or via a link.
To do this:
- On the action menu, select “Upload/Manage Presentations”.

- On the presentation upload page, drag and drop your presentation file and select to enable download of the presentation based on your preference.

PDF File: Participants can download the presentation as a PDF document.
Via Link: Participants can access the presentation via a shareable link.
- Click on “Confirm”.
- The participants will be able to download the presentation.

e)Timer and stopwatch
Optimize time management during your sessions with the Timer and Stopwatch functionality available for moderators. To activate the Timer or Stopwatch:
- Click on the plus button located in the action menu and select “Activate Timer/Stopwatch”.

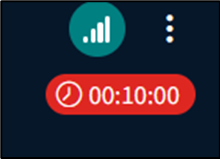
- Adjust the countdown duration or start the stopwatch based on the desired time frame for your session.

- Once customized, the timer or stopwatch will be visible to all participants in the session, creating a shared sense of time.

f)Reactions Bar
The Reactions Bar is a valuable feature designed to streamline participants interaction fostering a more dynamic and engaging virtual session environment.
To set a reaction during a session:
- Navigate to the bottom of the presentation view and select the hand icon.
![]()
- Once selected, a selection of emojis will be available.

- Choose the emoji that best represents your reaction to the ongoing discussion or presentation.
- The selected emoji is displayed in your user avatar area.

- Your reactions remain visible in the participants list, allowing for real-time feedback and interaction.
- As a moderator you can unselect reactions when you no longer wish to display them.
g)User Notifications
Notifications will keep you informed about important events during your sessions. You can choose to receive or block notifications for “chat messages, user join/leave actions, and raise hand” through audio alerts and popup notifications. To enable this:
- Click on the three dots located in the top-right corner.
- Select the gear icon (Settings)
![]()
- On the settings page, select "Notifications" from the menu.

- Toggle the switch to enable or disable audio/popup alerts for “chat message, user join, user leave and raise hand”.
- Once you have configured your preferred settings, click on the "Save" button.
